Meet Git
This page will introduce you to the basics of using Git:
These materials have been adapted for the geo-python course from GitHubClassroom Campus Advisors -resources, and inspired by other online resources such as https://git-scm.com/about/.
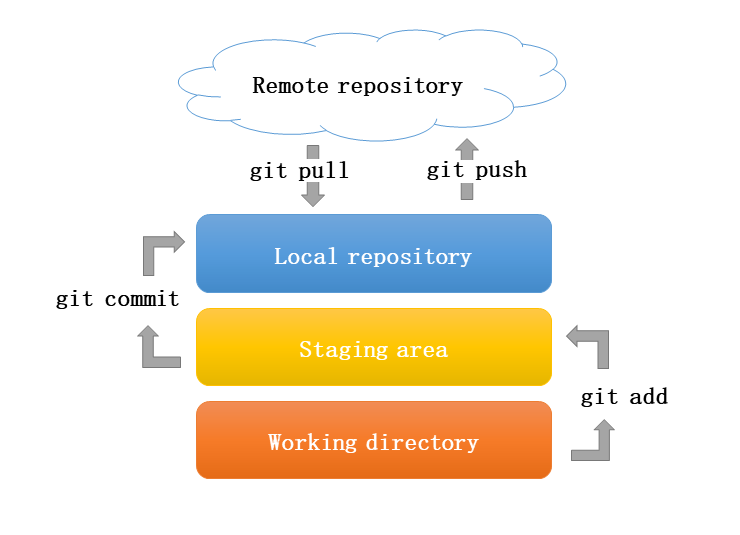
Different stages of version control using Git and Github (adapted from Git webpages)
After going trough this tutorial, you should be aware of at least the following git-commands:
- git clone [url] - download a project from GitHub
- git add [file] or git add . - add a snapshot of changes to the staging area
- git status - review the status of your repository (use this command often at every stage!)
- git commit -m “[informative message]” - record changes permanently in version history
- git pull - download and incorporate changes. Always pull before you push (especially when working in a shared repository)!
- git push - upload local commits to GitHub
For other useful git commands, you can refer to the GIT CHEAT SHEET
We will use git from the command line in this tutorial and throughout the course. Code Academy’s list of command line commands provides a good overview of commonly used commands for navigating trough files in the Terminal. The instructions below are compatible with the Linux terminal (which is available in the course environment).
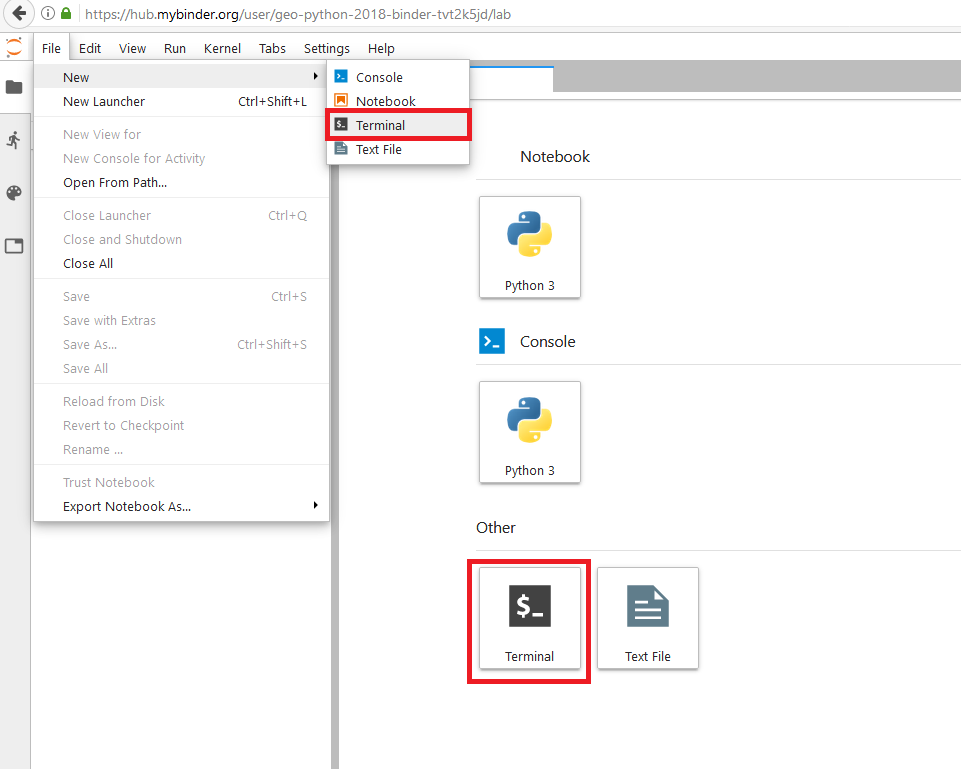
At this point, you should launch JupyterLab and open a terminal window, for example trough Binder:
First, check if you have git installed by typing this command in the terminal window:
$ git --version
Anything above version 2 is just fine.
Clone a repository from GitHub
We will clone an existing repository from GitHub and start modifying it. A repository, or “Git project”, or a “repo”, is a location for storing files. A repo contains all the files and folders associated with a project and the revision history of each entity. In general, it is recommended that each project, library or discrete piece of software should have it’s own repository. In this course each exercise has it’s own repository.
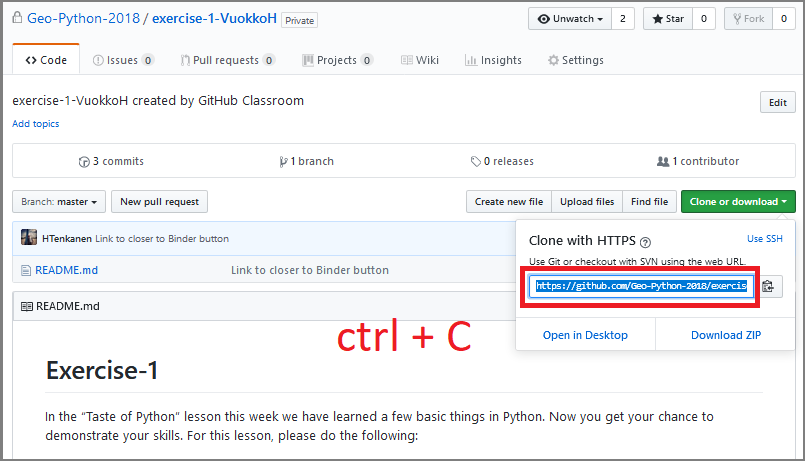
We will clone Exercise-1 repository from week 1 for practicing how to work with Git and GitHub. Navigate to your personal exercise-1 repository in https://github.com/Geo-Python-2018/ and copy the web URL which you can find under the Clone or download -button:
Clone the repository into JupyterLab using the git clone command:
$ git clone [paste your URL here]
Note
You can paste text on the terminal trough Shift + Right Click --> paste
Git will prompt you for GitHub username and password:
Cloning into 'exercise-1-VuokkoH'...
Username for 'https://github.com': VuokkoH
Password for 'https://VuokkoH@github.com':
remote: Counting objects: 9, done.
remote: Compressing objects: 100% (5/5), done.
remote: Total 9 (delta 1), reused 9 (delta 1), pack-reused 0
Unpacking objects: 100% (9/9), done.
Once cloning is completed, check what happened by listing directory contents in the terminal using the ls command (if you are working on a windows machine, use dir instead):
$ ls
You should now see the exercise repository listed in the terminal (and also in the navigation pane in JupyterLab). Navigate to the repository using the cd command:
$ cd exercise-1-username
List all files inside the repository using the ls command, and include hidden files in a long format using the ls -a (on Windows, use dir /a):
$ ls -a
Check the status of your repository using the git status command, which provides change information about the repository (this is the most common git command - use it often!):
$ git status
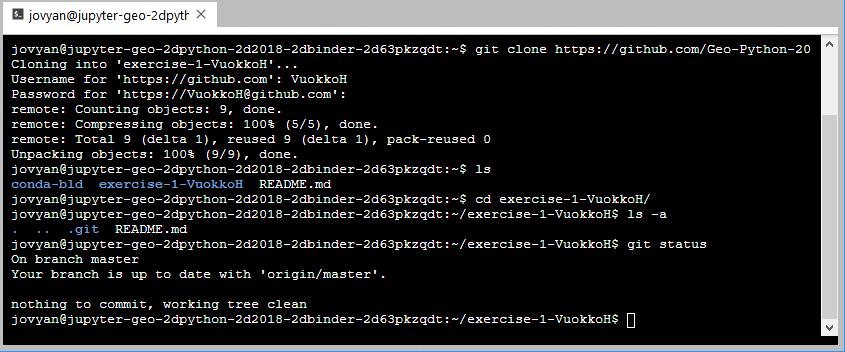
As we didn’t make any changes yet, git should tell that the project is up to date. At this stage, your terminal window should look something like this:
Git status also tells that you are on branch master. During this course you don’t have to worry much about branches, but it is good to know that master branch is always the default branch. A branch is a parallel version of a repository which can be developed separately before merging the changes to the primary version. You can read more about branches here.
Add changes
Create an empty markdown-file named test.md under the exercise-1 repository. You can either create the file manually (do this if you are using windows!), or in the terminal using the touch -command:
$ touch test.md
List all files inside the repository (you should see the new file listed in the terminal)
$ ls
check the status of the repository:
$ git status
Git should tell you that it detected untracked files:
$ git status
On branch master
Your branch is up to date with 'origin/master'.

Untracked files:
    (use "git add <file>..." to include in what will be committed)

        .ipynb_checkpoints/
        test.md

nothing added to commit but untracked files present (use "git add" to track)
Start tracking the file with git using the command git add:
$ git add test.md
check again the status of the repository
$ git status
Git status shows that there is a new file under the “Changes to be committed” -heading:
$ git add test.md
$ git status
On branch master
Your branch is up to date with 'origin/master'.

Changes to be committed:
  (use "git reset HEAD <file>..." to unstage)

        new file:   test.md
Next, edit the contents of the test.md -file
(you can do this manually! Open up the file and add a few lines of text)
check the status of your repository:
$ git status
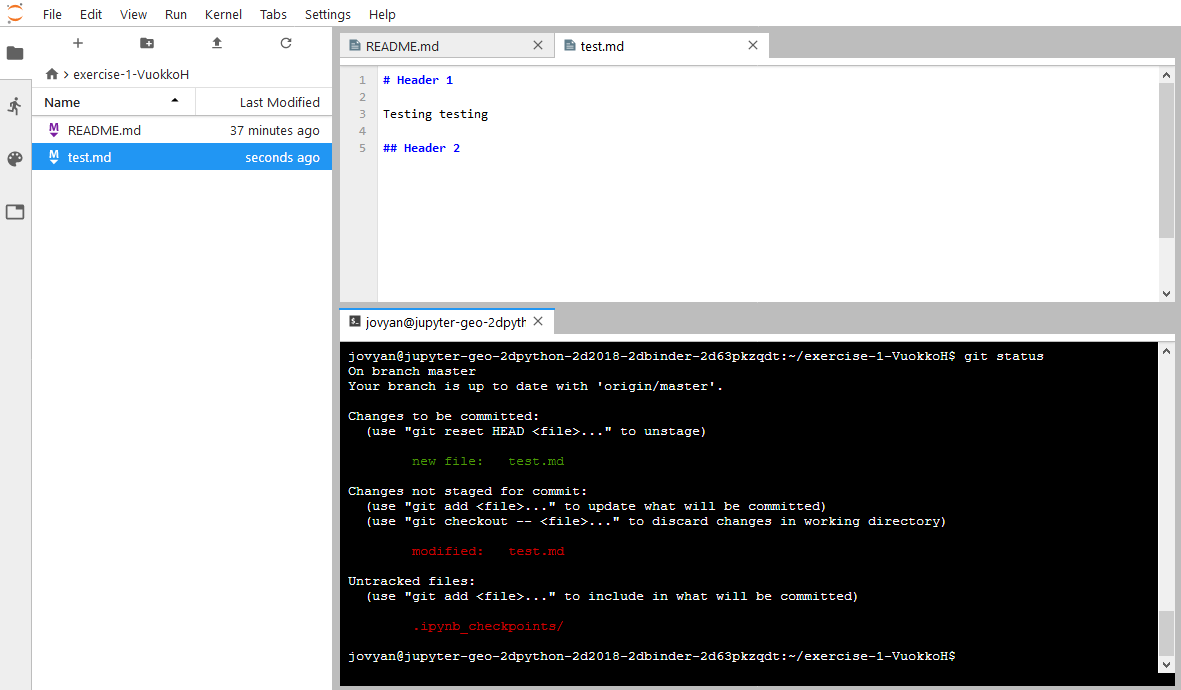
Git now tells you that there are changes that are ready to be committed (the new file), and changes that have not yet been staged for commit (modifications to that file):
Changes to be committed:
  (use "git reset HEAD <file>..." to unstage)

        new file:   test.md

Changes not staged for commit:
  (use "git add <file>..." to update what will be committed)
  (use "git checkout -- <file>..." to discard changes in working directory)

        modified:   test.md
Add a snapshot of your changes to the ‘staging area’ using the git add:
$ git add test.md
The staging area is an index that prepares content for the next commit.
Commit changes
Before committing your changes, check again the status of your repository:
$ git status
Git status tells you that 1 new file (test.md) is ready to be committed:
$ git status
On branch master
Your branch is up to date with 'origin/master'.

Changes to be committed:
  (use "git reset HEAD <file>..." to unstage)

        new file:   test.md
Commit your changes to the repository and include a message to accompany the change:
$ git commit -m "added a test file"
Check the status:
$ git status
Git status tells that your branch is ahead of the remote repository’s master branch by 1 commit, and tells you to use git push to publish the local changes:
$ git status
On branch master
Your branch is ahead of 'origin/master' by 1 commit.
  (use "git push" to publish your local commits)
Synchronize changes
Next, we want to synchronize our changes with the remote repository on GitHub. First, it’s good to use git pull to double check for remote changes before contributing your own changes.
$ git pull
Git should tell you that the repository is “Already up-to-date”.
Let’s make a network call and send data to branch ‘master’ in the remote repository using git push:
$ git push origin master
or just simply
$ git push
Git will prompt you for unsername and password before pushing the changes online:
jovyan@jupyter-geo-2dpython-2d2018-2dbinder-2d63pkzqdt:~/exercise-1-VuokkoH$ git push
Username for 'https://github.com': VuokkoH
Password for 'https://VuokkoH@github.com':
Counting objects: 3, done.
Delta compression using up to 8 threads.
Compressing objects: 100% (2/2), done.
Writing objects: 100% (3/3), 316 bytes | 316.00 KiB/s, done.
Total 3 (delta 0), reused 0 (delta 0)
To https://github.com/Geo-Python-2018/exercise-1-VuokkoH.git
   b33a43a..c4be7c3  master -> master
Now, you should see the updates in GitHub (go and have a look at your repository in https://github.com/Geo-Python-2018/ )!
If you want to double check that you have a remote location, you can use the git remote command (v stands for ‘verbose’ which prints out more details):
$ git remote -v
Check once more the status of your repository:
$ git status
Git will tell you that the master branch is up to date and synchronized:
$ git status
On branch master
Your branch is up to date with 'origin/master'.
That’s all you need to know about Git for know :)
Configuration
Configuring Git by storing your Git username and email can be useful especially if working from own computer as you do not need to fill these information every time when you are e.g. pulling or pushing from remote repository. The username you set, will be attached to your commits:
$ git config --global user.name "[Your Name]"

$ git config --global user.email "[email@example.com]"
You can check existing user information with these commands:
$ git config user.name

$ git config user.email
It is also possible to cache your GitHub password (be careful with this!) by running following command from Git shell:
$ git config --global credential.helper wincred