
Functions
Contents
Functions#
Attention
Finnish university students are encouraged to use the CSC Notebooks platform.
![]()
Others can follow the lesson and fill in their student notebooks using Binder.
![]()
In this lesson we introduce functions as a way of making blocks of code for a specific task that are easy to use and re-use in your programs.
Sources#
This lesson is partly based on the Software Carpentry group’s lessons on Programming with Python.
What is a function?#
A function (funktio) is a block of organized, reusable code that can make your programs more effective, easier to read, and simple to manage.
You can think functions as little self-contained programs that can perform a specific task that you can use repeatedly in your code.
One of the basic principles in good programming is “do not repeat yourself”.
In other words, you should avoid having duplicate lines of code in your scripts.
Functions are a good way to avoid such situations and they can save you a lot of time and effort as you don’t need to tell the computer repeatedly what to do every time it does a common task, such as converting temperatures from Fahrenheit to Celsius.
During the course we have already used some functions such as the print() command which is actually a built-in function in Python.
Anatomy of a function#
Let’s consider the task from the first lesson when we converted temperatures from Celsius to Fahrenheit. Such an operation is a fairly common task when dealing with temperature data. Thus we might need to repeat such calculations quite often when analysing or comparing weather or climate data between the US and Europe, for example.
Our first function#
Let’s define our first function called celsius_to_fahr.
def celsius_to_fahr(temp):
    return 9 / 5 * temp + 32
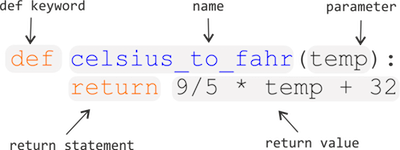
The function definition opens with the keyword def followed by the name of the function and a list of parameter names in parentheses.
The body of the function — the statements that are executed when it runs — is indented below the definition line.
When we call the function, the values we pass to it are assigned to the corresponding parameter variables so that we can use them inside the function (e.g., the variable temp in this function example).
Inside the function, we use a return statement to define the value that should be given back when the function is used, or called.
Defining a function does nothing other than make it available for use in our notebooks. In order to use the function we need to call it.
Calling functions#
Using our new function#
Now let’s try using our function.
Calling our self-defined function is no different from calling any other function such as print().
You need to call it with its name and provide your value(s) as the required parameter(s) inside the parentheses.
Here, we can define a variable freezing_point that is the temperature in degrees Fahrenheit we get when using our function with the temperature 0°C (the temperature at which water freezes). We can then print that value to confirm. We should get a temperature of 32°F.
freezing_point = celsius_to_fahr(0)
print(f"The freezing point of water in Fahrenheit is {freezing_point}")
We can do the same thing with the boiling point of water in degrees Celsius (100°C). Just like with other functions, we can use our new function directly within something like the print() function to print out the boiling point of water in degrees Fahrenheit.
print(f"The boiling point of water in Fahrenheit is {celsius_to_fahr(100)}")
Let’s make another function#
Now that we know how to create a function to convert Celsius to Fahrenheit, let’s create another function called kelvins_to_celsius. We can define this just like we did with our celsius_to_fahr() function, noting that the Celsius temperature is just the temperature in Kelvins minus 273.15. Just to avoid confusion this time, let’s call the temperature variable used in the function temp_kelvins.
def kelvins_to_celsius(temp_kelvins):
    return temp_kelvins - 273.15
Using our second function#
Let’s use it in the same way as the earlier one by defining a new variable absolute_zero that is the Celsius temperature of 0 Kelvins. Note that we can also use the parameter name temp_kelvins when calling the function to explicitly state which variable value is being used. Again, let’s print the result to confirm everything works.
absolute_zero = kelvins_to_celsius(temp_kelvins=0)
print(f"Absolute zero in Celsius is {absolute_zero}")
Check your understanding#
Let’s see how things are going so far with functions. In the Python cell below, please:
Create a new function called
hellowith 2 parametersParameter 1 should be called
nameand you should assign some text to this parameter this when using the functionParameter 2 should be called
ageand you should provide a number value for this parameter when using the function
When using your function, the value that is returned should be a character string stating the name and age that were provided, which you can assign to a variable called output.
Printing out output should produce something like the following:
print(output)
'Hello, my name is Dave. I am 41 years old.'
# Here is a solution
def hello(name, age):
    return f"Hello, my name is {name}. I am {age} years old."


output = hello(name="Dave", age=41)
print(output)
Variable names and functions#
A common point of confusion for new programmers is understanding how variable names in functions relate to those defined elsewhere in your notebooks. When defining a function, the variable names given in the function definition exist and will only be used when the function is called. That might seem confusing, but as it turns out, this is an excellent feature in Python that can save you from much suffering. Let’s try to understand this by way of an example.
Let us define a new function called times2 that accepts a single value number and returns that number multiplied by 2.
def times2(number):
    new_number = number * 2
    return new_number
So here we have defined our function to accept number as its only parameter, calculate new_number, and return that value.
As you can see below, the variables defined in the function exist only in its namespace.
Let’s confirm that.
print(number)
print(new_number)
Here, in the global namespace we get a NameError when trying to access the variables number or new_number because they have only been defined within the times2() function.
Perhaps, however, you are thinking we have not yet called the function, and maybe then these values will be defined. Let’s try that.
times2(number=5)
print(number)
As you can see number is still not defined in the global namespace, where values such as freezing_point have been defined.
Why does Python work this way?
Well, as it turns out, the benefit of having a separate namespace for functions is that we can define a variable in the global namespace, such as number and not need to worry about its name within a function, or the use of a function changing its value.
Inside the function, the value that is passed will be known as number, but modifying that value will not alter a variable of the same name in the global namespace.
Let’s have a look at another example using a modified times2() function we can call times2v2().
def times2v2(number):
    number = number * 2
    return number
Here, we pass in a value as number and modify the value that is passed in before returning it.
This might not be a good idea in some cases because it could cause confusion, but it is perfectly valid code.
Let’s now define a variable number in the global namespace and use our function to multiply it by 2.
number = 15
times2v2(number=number)
number
As you can see, the value of the variable number in the global namespace was set to 15 and remains 15 after using the times2v2() function.
Although there is a variable inside that function with the same name as the value in the global namespace, using the function assigns the value of number inside the function and manipulates that value only inside the function.
Caution
Be aware that it is possible to access variable values in functions that have been defined in the global namespace, even if the value is not passed to the function. This is because Python will search for variables defined with a given name first inside the function, and then outside the function (the search domain is known as the variable’s scope). If such a value is found, it can be used by the function, which could be dangerous.
Let’s look at an example of behavior in a function that may be unexpected.
def my_function(value):
    value = number + 20
    return value
print(my_function(11))
You were perhaps expecting to see a value of 31 returned by my_function(), but that does not occur because value is assigned number + 20 in the function.
Although number was not passed to my_function() it is defined in the global namespace and thus can be used by our example function.
Since number = 15 we get a value of 35 returned when using my_function().
Conclusion: Be careful!
For those who are interested, more information about namespaces and variables scopes can be found on the Real Python website.
Functions within a function#
What about converting Kelvins to Fahrenheit?
We could write out a new formula for it, but we don’t need to.
Instead, we can do the conversion using the two functions we have already created and calling those from the function we are now creating. Let’s create a new function kelvins_to_fahr that takes the temperature in Kelvins as the parameter value temp_kelvins and uses our kelvins_to_celsius and celsius_to_fahr functions within the new function to convert temperatures from Kelvins to degrees Fahrenheit.
def kelvins_to_fahr(temp_kelvins):
    temp_celsius = kelvins_to_celsius(temp_kelvins)
    temp_fahr = celsius_to_fahr(temp_celsius)
    return temp_fahr
Using our combined functions#
Now let’s use the function to calculate the temperature of absolute zero in degrees Fahrenheit. We can then print that value to the screen again.
absolute_zero_fahr = kelvins_to_fahr(temp_kelvins=0)
print(f"Absolute zero in Fahrenheit is {absolute_zero_fahr}")
An introduction to script files#
Up to this point we have been keeping our Python code and Markdown comments in a single Jupyter notebook document.
This is great, but there are some cases, like when you have long Python code blocks or a set of functions used in many notebooks, in which you may want to have Python code in a separate document to make sure your Jupyter notebook is easy to read (and use).
An alternative to typing in all of the commands you would like to run is the list them in a Python script (ohjelma) file.
A Python script file is simply a file containing a list of the commands you would like to run, normally with one command per line, and formatted in the same way as if you were to type them in.
Python script files traditionally use the .py file extension in their names.
The general concept of a .py script file#
Because a Python script file is simply a list of commands that you might otherwise type into a Python cell in a Jupyter notebook or a Python console, we can quite easily create a basic script file and test things out.
Getting started#
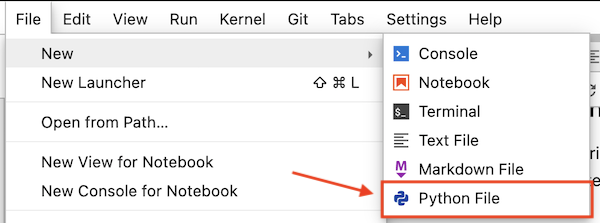
First, we need to create a new text file by clicking on File -> New -> Python File in the JupyterLab menu bar.
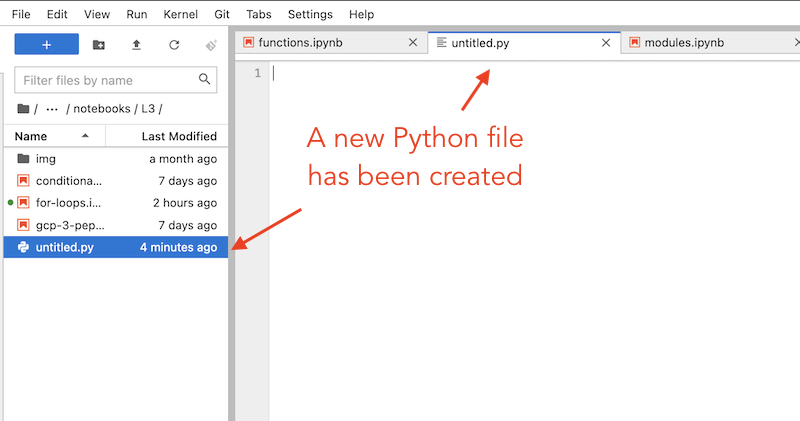
This will create a new tab in your JupyterLab window that should look something like that below, a blank slate.
Start by copying and pasting the text below into your new text file editor panel.
def celsius_to_fahr(temp_celsius):
    return 9/5 * temp_celsius + 32
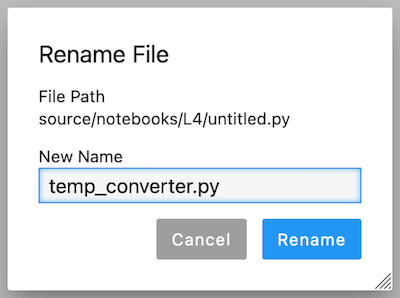
Renaming our Python file#
Python scripts are just regular text files with the .py file extension that will identify them as source code for Python in JupyterLab.
By default, new Python files will be called untitled.py.
You can rename the file by right clicking on the tab titled untitled.py and renaming it as temp_converter.py.
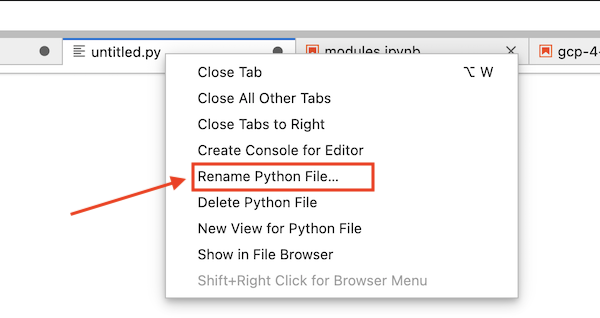
Note
Be sure to save your temp_converter.py file after making your changes.
We’ll return later to some best practices for writing script files, but for now let’s continue with how to use our functions saved in the Python file we just created.
Saving and loading functions#
Functions such as the ones we just created can also be saved in a script file and called from Jupyter notebooks.
In fact, quite often it is useful to create a dedicated function library for functions that you use frequently, when doing data analysis, for example.
Basically this is done by listing useful functions in a single .py file from which you can then import and use them whenever needed.
Saving functions in a script file#
Basically, we’ve just seen how to save some functions to a script file.
Let’s now add the other functions we had been using to our script.
Simply copy and paste the text below into your temp_converter.py file leaving one blank line between each function.
def kelvins_to_celsius(temp_kelvins):
    return temp_kelvins - 273.15
def kelvins_to_fahr(temp_kelvins):
    temp_celsius = kelvins_to_celsius(temp_kelvins)
    temp_fahr = celsius_to_fahr(temp_celsius)
    return temp_fahr
Don’t forget to save your changes!
Calling functions from a script file#
Now that we have saved our temperature conversion functions into a script file we can start using them.
Making sure we’re in the right working directory#
Hopefully you have saved your temp_converter.py file in the same location as this Jupyter notebook (functions.ipynb).
If so, that’s good, but we need to do one more thing to be able to start working with it.
We need to change the working directory in JupyterLab to be the one where the temp_converter.py exists.
First, we can check where we are working currently using an IPython magic command called %ls.
%ls
Your output from %ls probably looks different than that above, but don’t worry.
%ls allows us to see the files located in the directory where we are currently working.
Binder users#
If you are using Binder, you may see
functions.ipynb img/ modules.ipynb temp_converter.py writing-scripts.ipynb
for example. If this is the case, you are all set to continue!
If you see something else, such as
L1/ L2/ L3/ L4/ README.md requirements.txt
you will need to change directories.
To do this you should type the following to change into the directory containing the temp_converter.py file.
%cd L4/
CSC notebooks users#
Those using the CSC notebooks might see something like
exercises/ installations.sh* notebooks/
In this case you will need to change directories to the one containing the temp_converter.py file.
You can do this by typing
%cd notebooks/L4/
Confirming we are in the correct directory#
If all has gone well you should now see temp_converter.py among the files when you type %ls in a Python cell.
Try that out below.
%ls
If you see temp_converter.py in the list of files above you are all set to continue.
Importing our script functions#
Let’s now import our celsius_to_fahr() function from the other script by adding a specific import statement in the Python cell below: from temp_converter import celsius_to_fahr
# DO NOT RUN THIS CELL
# This cell is only needed for generating the course web page
%cd ../../_static/L4/
from temp_converter import celsius_to_fahr
Using our script functions#
Let’s also use the function so that we can see that it is working. We can print the temperature in Fahrenheit at which water freezes using our celsius_to_fahr() function in the cell below.
print(f"The freezing point of water in Fahrenheit is {celsius_to_fahr(0)}")
You should get following output:
The freezing point of water in Fahrenheit is 32.0
Importing multiple functions#
It is also possible to import more functions at the same time by listing and separating them with a comma.
from my_script import func1, func2, func3
Importing all functions from a script#
Sometimes it is useful to import the whole script and all of its functions at once. Let’s use a different import statement and test that all functions work. This time we can type import temp_converter as tc.
import temp_converter as tc
Just like the examples we have seen earlier with the math library, such as using math.sin(), we can now use our functions such as tc.celsius_to_fahr(). In the cells below, test our functions as they were used above by printing the freezing point of water in Fahrenheit, absolute zero in Celsius, and absolute zero in Fahrenheit.
print(f"The freezing point of water in Fahrenheit is {tc.celsius_to_fahr(0)}")
print(f"Absolute zero in Celsius is {tc.kelvins_to_celsius(temp_kelvins=0)}")
print(f"Absolute zero in Fahrenheit is {tc.kelvins_to_fahr(temp_kelvins=0)}")
Temperature calculator (optional, advanced topic)#
So far our functions have had only one parameter, but it is also possible to define a function with multiple parameters.
Let’s now make a simple temp_calculator function that accepts temperatures in Kelvins and returns either Celsius or Fahrenheit.
The new function will have two parameters:
temp_k= The parameter for passing temperature in Kelvinsconvert_to= The parameter that determines whether to output should be in Celsius or in Fahrenheit (using lettersCorFaccordingly)
Defining the function#
Let’s start defining our function by giving it a name and setting the parameters.
def temp_calculator(temp_k, convert_to):
Adding some conditional statements#
Next, we need to add conditional statements that check whether the desired output temperature should be in Celsius or Fahrenheit, and then call the corresponding function that was imported from the temp_converter.py file.
def temp_calculator(temp_k, convert_to):
    # Check if user wants the temperature in Celsius
    if convert_to == "C":
        # Convert the value to Celsius using the dedicated function for the task that we imported from another script
        converted_temp = kelvins_to_celsius(temp_kelvins=temp_k)
    elif convert_to == "F":
        # Convert the value to Fahrenheit using the dedicated function for the task that we imported from another script
        converted_temp = kelvins_to_fahr(temp_kelvins=temp_k)
Returning the result#
Next, we need to add a return statement so that our function sends back the value that we are interested in.
def temp_calculator(temp_k, convert_to):
    # Check if user wants the temperature in Celsius
    if convert_to == "C":
        # Convert the value to Celsius using the dedicated function for the task that we imported from another script
        converted_temp = kelvins_to_celsius(temp_kelvins=temp_k)
    elif convert_to == "F":
        # Convert the value to Fahrenheit using the dedicated function for the task that we imported from another script
        converted_temp = kelvins_to_fahr(temp_kelvins=temp_k)
    # Return the result
    return converted_temp
Adding a docstring#
Finally, since we want to be good programmers, we should add a short docstring at the beginning of our function that tells what the function does and how the parameters work.
def temp_calculator(temp_k, convert_to):
    """
    Function for converting temperature in Kelvins to Celsius or Fahrenheit.

    Parameters
    ----------
    temp_k: <numerical>
        Temperature in Kelvins
    convert_to: <str>
        Target temperature that can be either Celsius ('C') or Fahrenheit ('F'). Supported values: 'C' | 'F'

    Returns
    -------
    <float>
        Converted temperature.
    """

    # Check if user wants the temperature in Celsius
    if convert_to == "C":
        # Convert the value to Celsius using the dedicated function for the task that we imported from another script
        converted_temp = kelvins_to_celsius(temp_kelvins=temp_k)
    elif convert_to == "F":
        # Convert the value to Fahrenheit using the dedicated function for the task that we imported from another script
        converted_temp = kelvins_to_fahr(temp_kelvins=temp_k)
    # Return the result
    return converted_temp
Testing the new function#
That’s it!
Now we have a temperature calculator that has a simple control for the user where they can change the output using the convert_to parameter.
Now as we added the short docstring in the beginning of the function we can use the help() function in Python to find out how our function should be used.
Run the Python cell below and then try running help(temp_calculator).
Attention
Reloading modules from within a Jupyter notebook is a bit of a pain. The easiest option is to restart the IPython kernel by going to Kernel -> Restart kernel…. Note that this will delete all variables currently stored in memory in the Jupyter notebook you’re using, so you may need to re-run some cells.
help(tc.temp_calculator)
Using the tempCalculator#
Let’s use it.
temp_kelvin = 30
temperature_c = tc.temp_calculator(temp_k=temp_kelvin, convert_to="C")
print(f"Temperature {temp_kelvin} in Kelvins is {temperature_c} in Celsius")